Excel Page Setup: Step-by-Step Guide for Printing Large Excel Sheets Perfectly
Microsoft Excel is great for organizing data, but printing large spreadsheets can be a challenge. Rows get cut off, columns spill over, or the print size is unreadably small. That’s where Page Setup in Excel becomes your best friend.
In this blog post, you’ll learn how to set up an Excel worksheet for clean, professional-looking prints — especially when working with large sheets. We’ll cover margins, scaling, headers, footers, orientation, print area, and more.
🔍 What is Page Setup in Excel?
Page Setup is a group of settings in Excel that allows you to configure how your worksheet will appear on paper before printing. It helps you control:
- Page orientation (Portrait or Landscape)
- Margins
- Paper size
- Scaling (fit all columns/rows on one page)
- Print area
- Page breaks
- Headers and footers
- Gridlines and headings visibility
📌 Why Page Setup is Important (Especially for Large Prints)
Without proper setup:
- Important data may get cut off
- The sheet may print on many unnecessary pages
- Printouts may be hard to read
- Margins and alignments can appear unprofessional
With proper setup:
✅ Everything fits neatly
✅ You save paper and ink
✅ You present a clean, readable printout
✅ Your reports look professional
📝 Step-by-Step Guide: Excel Page Setup for Large Prints
Step 1: Open Page Layout Tab
- Open your Excel workbook.
- Go to the Page Layout tab in the ribbon.
- You’ll see options like Margins, Orientation, Size, Print Area, Breaks, and Scale to Fit.
Step 2: Set Orientation (Portrait or Landscape)
- Portrait: Taller than wide (best for fewer columns).
- Landscape: Wider than tall (best for many columns).
📍 For wide Excel sheets, select:
Page Layout → Orientation → Landscape
Step 3: Set Paper Size
Choose the correct paper size to match your printer or report requirement.
Page Layout → Size → A4 (or choose A3, Letter, Legal, etc.)
✅ For large sheets, A3 or Legal is often more suitable than A4.
Step 4: Adjust Margins
Margins are the space between the data and the page edge.
Page Layout → Margins → Custom Margins
Set:
- Top/Bottom: 0.5″ to 1″
- Left/Right: 0.3″ to 0.5″ (for more space)
Optional: Enable Center on Page → Horizontally for better alignment.
Step 5: Set Print Area
If you want to print only a specific range:
Select the range → Page Layout → Print Area → Set Print Area
This prevents blank pages and unnecessary rows from printing.
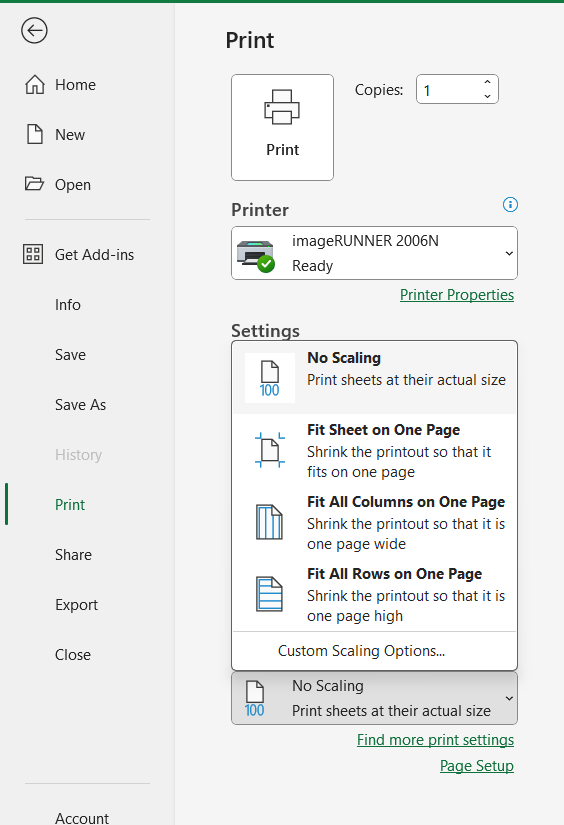
Step 6: Use “Fit to Page” Scaling
Avoid data getting cut off by using scaling options:
Page Layout → Scale to Fit
- Width: 1 page
- Height: Automatic (or 1 page for a single page print)
This tells Excel to shrink or expand the content to fit one page wide.
Alternative:
File → Print → Scaling → Fit All Columns on One Page
Step 7: Insert Page Breaks (Optional)
Page breaks control where Excel starts a new page.
Page Layout → Breaks → Insert Page Break
Use Page Break Preview from the bottom right corner to adjust visually.
Step 8: Add Headers and Footers
Add custom headers and footers for printouts (company name, date, page numbers).
Insert → Text → Header & Footer
Or via:
Page Layout → Page Setup Dialog Box → Header/Footer tab
Common options:
- Page numbers
- Sheet name
- File path or report title
Step 9: Show Gridlines or Headings
To include cell borders or column labels (A, B, C), toggle options:
Page Layout → Sheet Options → Print → Gridlines & Headings
✅ This is useful for instructional handouts or raw data reports.
Step 10: Preview Before Printing
Always check how your document will appear when printed.
File → Print (or Ctrl + P)
Use the Print Preview to scroll through pages and ensure nothing’s missing.
✅ Best Practices for Printing Large Excel Sheets
- Use Landscape Orientation for wide tables.
- Apply “Fit All Columns on One Page” to avoid cut-offs.
- Adjust column widths and font sizes before printing.
- Use Freeze Panes to keep headers visible on screen, but apply headers in footer when printing.
- Repeat row labels on every page: Page Layout → Print Titles → Rows to Repeat at Top
- Use light shading or borders to make reports easier to read.
- Avoid colored backgrounds if printing in black-and-white.
🔁 Quick Recap: Page Setup Checklist
| Setting | Best Option for Large Print |
|---|---|
| Orientation | Landscape |
| Paper Size | A4 / A3 / Legal |
| Margins | Narrow or Custom |
| Scaling | Fit All Columns on One Page |
| Print Area | Set to specific range |
| Gridlines/Headings | Enable if helpful for context |
| Headers/Footers | Add page numbers, file name, date |
🎯 Conclusion: Make Your Excel Prints Perfect
Printing in Excel can be frustrating — but it doesn’t have to be. With the right Page Setup, even large datasets can be printed clearly and professionally on just a few pages.
So before hitting “Print”, spend a few minutes configuring your settings. It’ll save you time, paper, and a whole lot of formatting headaches.